
Confused by eSIMs? Noooo… don’t be! Here’s my VERY simple guide to buying, installing and using a MobiMatter eSIM on iPhone / Android, with screenshots and NO tech talk! (cos im not a techie myself 😂 )
CLICK this link to purchase your eSIM
Activate 1-2 days before you travel
🌍 WHY DO YOU NEED AN eSIM?
An eSIM is basically a SIM card thats already built into your phone
So, instead of taking your physial SIM card out, you buy a data package online and install it digitally… simple!
I usually buy it 1 day before on the app and it usually takes me under a minute to install the eSIM and turn it on!
NOTE:
an eSIM with Mobimatter is usually data only (no phone calls) but these days you can call via whatsapp and viber anyways, so its included in the data instead of making actual phone calls
With an eSIM you will have internet for:
📍 Google Maps
💬 WhatsApp
🚕 Uber / Bolt
✈️ Airline apps
🏨 Hotel bookings
📧 Email
🌐 Browsing the internet
And the good thing is, you can pay for what you will use – no going back home and seeing the bill the next month! ewww….
This post is a GUIDE only… make sure to check the terms and conditions when purchasing your eSIM (as in some countries the installation and rules are different)
NEVER USED AN eSIM BEFORE?
Ive tried to keep this guide as simple as possible with enough info to get your eSIM installed! I’m going to take you through it, from buying your eSIM to getting internet when you land. You don’t need to be good with phones, and you don’t need to understand how an eSIM works. Just follow the pictures!
💰 BUT IS AN eSIM ACTUALLY CHEAPER?
You can skip right through this section if you want, but I looked up some examples of price differences to give an idea
EXAMPLE 1 – TELSTRA: 10 DAYS IN ROME – Longer duration travel
TELSTRA:
AUD $100 for 10 days
VS
MOBIMATTER:
US $9.99 for 12GB / 30 days
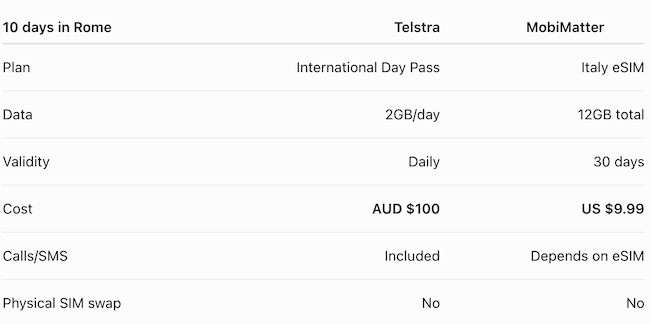
This is comparing ain Telstra International Day Pass to a 30 day eSIM with 12GB which is quite a lot of data!
The Telstra International Day Pass costs $10 AUD per day for travel to Italy
(There would be some cheaper carriers but I think there wouldnt be less than $5 AUD per day)
EXAMPLE 2 — UCOM: ARMENIA → GEORGIA – short 1 day trip
Im with UCOM and decided to take a look at what they offer…
Ucom currently offers a uTravel 1GB roaming bundle for Georgia costing 1,990 AMD, valid for 7 days, thats $7.95au
Ill use my own travel as an example here… I just got back from Georgia on a day trip and I bought a 1GB Mobimatter data eSIM for $5.50au, so I did end up saving some money – I didnt need calls, just data
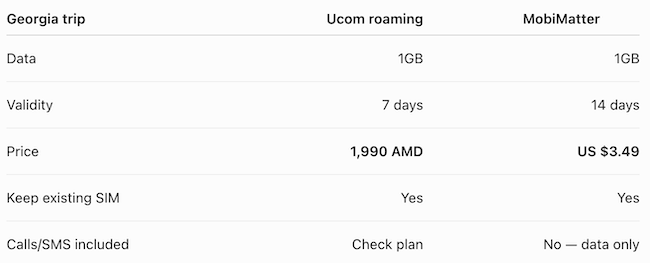
So, in this example, being for a shorter trip and in the neighbouring country, an eSIM is cheaper, but isnt always dramatically cheaper… however, if you are going to other countries and for longer trips, the difference can be much more noticeable!
📱 BEFORE YOU BUY ANYTHING — CHECK YOUR PHONE!
STOP!
CHECK THIS FIRST… is your phone compatible??
1. Open your PHONE app.
2. Dial *#06#
3. Look for something called EID
If you see an EID number, then your phone supports eSIM…
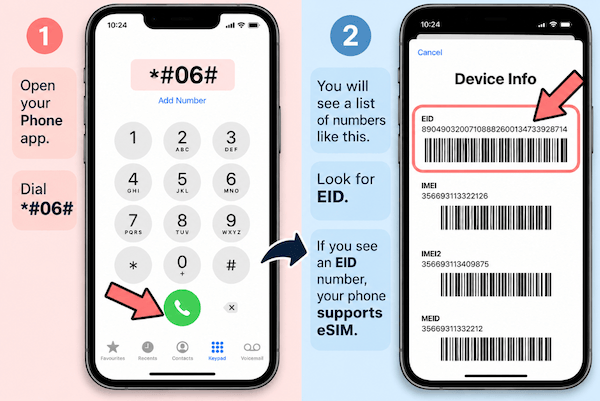
Your phone also needs to be UNLOCKED to be able to have an eSIM installed
When you have checked this, you’re good to go!
PART 1 : BUYING YOUR MOBIMATTER eSIM
STEP 1 — GO TO MOBIMATTER : click here -> Buy an eSIM or via the app on your phone
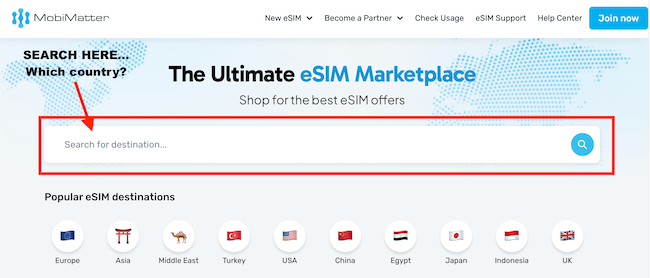
If you are using the website, enter all countries of travel here:
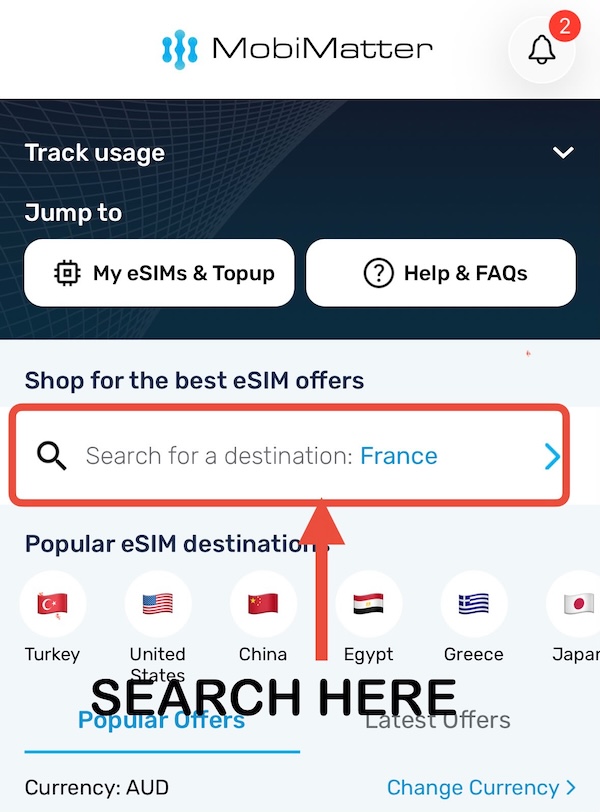
On the app on your phone, enter the country/countries of travel here…
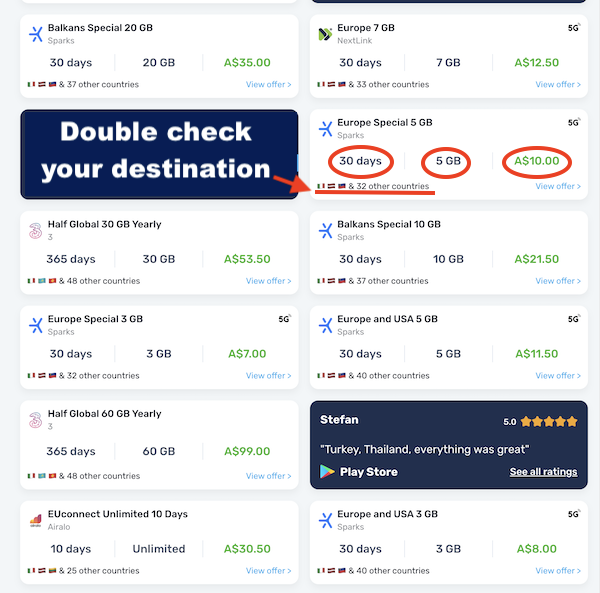
A selection of available eSIMs will pop up… and you can scan through and filter by duration or GB to search for which eSIM best suits your time of travel
Look mainly at:
DATA: How many GB?
VALIDITY: How many days?
PRICE: How much?
COUNTRIES: Where does it work?
Tap the package you want and click on BUY NOW on the next page…
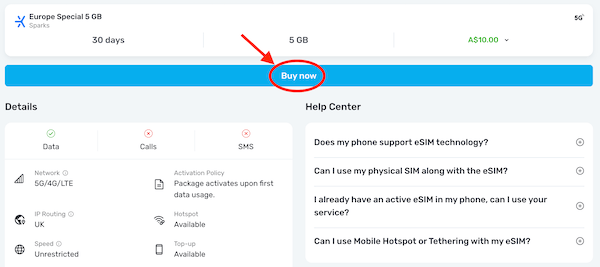
Complete the payment on the next page
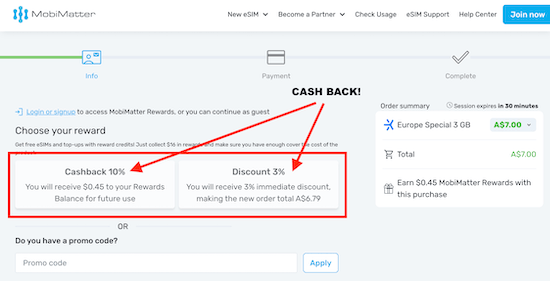
Mobimatter has a CASHBACK / DISCOUNT program on every eSIM you purchase, you can choose to get 10% cashback into your Mobimatter account for future use, or a discount on the existing eSIM you are about to purchase
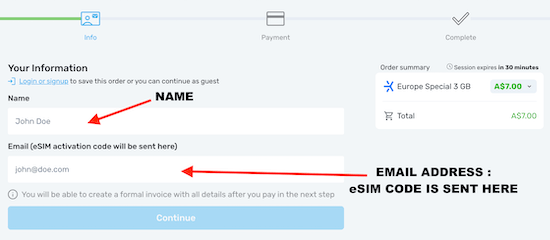
NOTE:
Supplying a valid email address is required as the eSIM is sent there if you order online
If you are buying via the app, then the eSIM is in the app and easy to install
CONGRATS!
Once you have purchased the eSIM, it will appear under My eSIMs in the Mobimatter app – they also provide easy to follow installation details/QR code
PART 2 : INSTALLING IT ON AN iPHONE
VERY IMPORTANT: YOU NEED TO HAVE GOOD WI-FI CONNECTION FROM THIS STEP ON…
I have always used airport wifi and have never had any problems
Option 1: In-App Installation
- Open the MobiMatter app.
- Go to My eSIMs.
- Select the eSIM you want to install.
- Tap Show QR Code / Install eSIM.
- Follow the on-screen instructions to complete the installation
MobiMatter currently recommends its in-app Install Now method because the eSIM can be added directly without having to scan a QR code
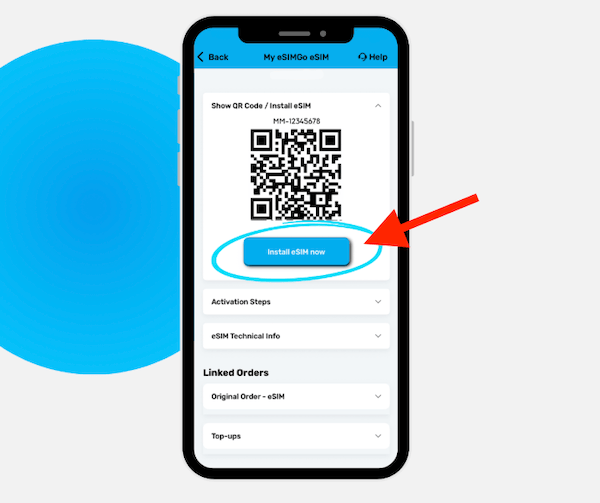
Option 2: Install Using a QR Code
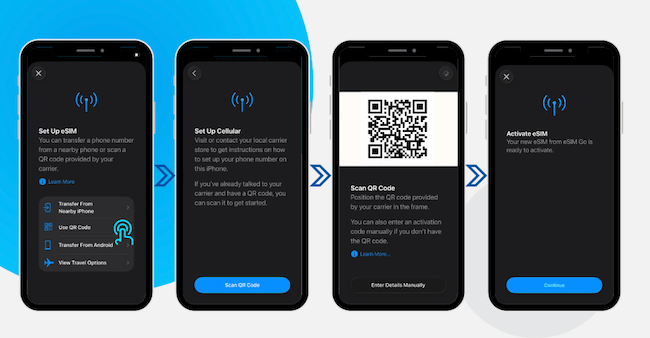
If you prefer manual installation, you can scan the QR code using your device settings.
IPHONE
- Go to Settings > Cellular.
- Tap Add eSIM.
- Select Use QR Code.
- Scan the QR code displayed on your other device.
- Complete the installation by following the on-screen prompts.
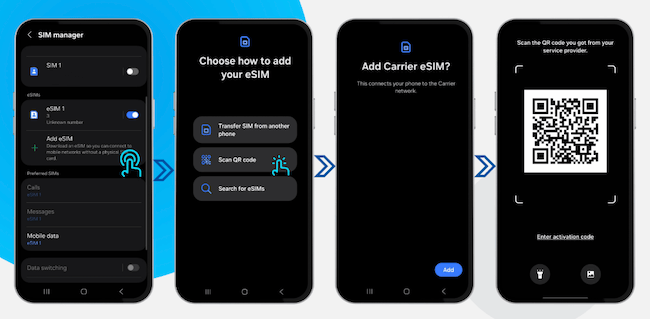
SAMSUNG
- Open Settings > Connections.
- Tap SIM Manager.
- Select Add eSIM.
- Choose Scan QR Code.
- Scan the QR code and confirm the installation.
HELP on how to install the eSIM -> go here
PART 3 : ACTIVATING THE eSIM
INSTALLING IT ON IPHONE
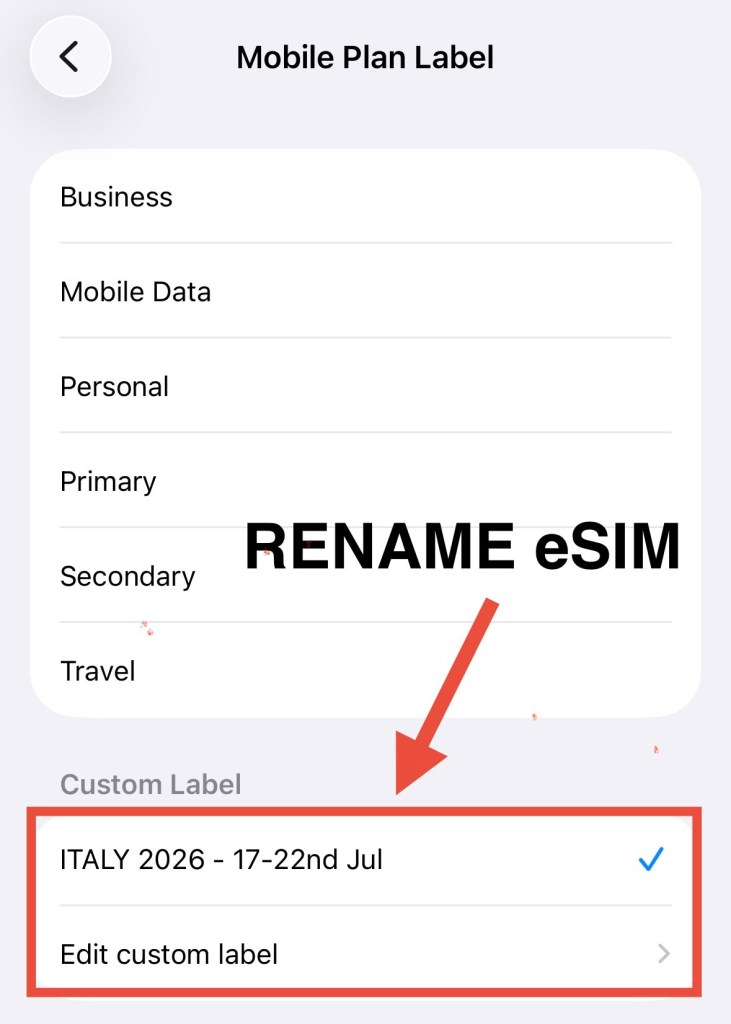
This part is REALLY important… my tip is MAKE SURE TO NAME YOUR eSIM as soon as you activate it
It takes me literally not even 1min to set up and install my eSIM including this part…
Activate & Label the eSIM
Go to Settings > Mobile
Scroll to the bottom of the list to find your new eSIM and toggle it ON so it shows a green colour
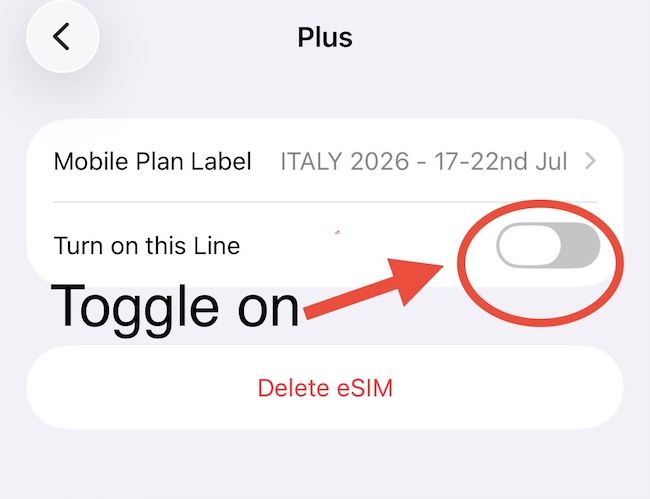
Then Tap Mobile Plan label and rename it for easy identification
🚨 VERY IMPORTANT
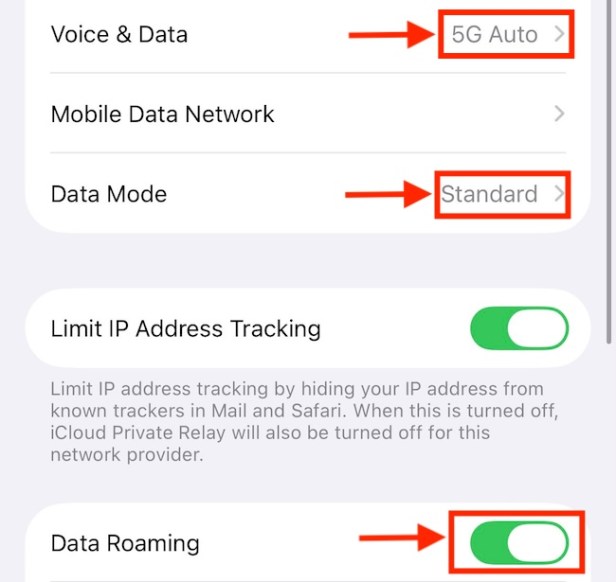
Turn DATA ROAMING ON for the MOBIMATTER eSIM
- Tap on your eSIM and ensure Data Roaming is toggled ON
- Voice & Data should be set to 5G auto or 4G/LTE
- Data Mode should be set to Standard
Turn Off your ORIGINAL SIM (from home)
Go back to Mobile menu and Toggle off your original sim as your new eSIM is on and being used now
HELP on how to activate the eSIM -> go here
INSTALLING IT ON ANDROID
Android phones are a bit different whether you have Samsung, Google Pixel etc – but dont panic! lets give it a go 🙂
Go to:
SETTINGS
CONNECTIONS
SIM MANAGER
ADD eSIM
SCAN QR CODE
Once installed:
SETTINGS → CONNECTIONS → SIM MANAGER
Turn the new eSIM: ON ✅
Then under Preferred SIM / Mobile Data, select your new travel eSIM.
Next:
CONNECTIONS → MOBILE NETWORKS → DATA ROAMING → ON
check the APN against the details supplied with the eSIM if it hasn’t configured automatically
For Google Pixel, the route starts:
SETTINGS → NETWORK & INTERNET → SIMs
and again you make sure the eSIM is ON and selected for mobile data.
✈️ WHEN SHOULD I INSTALL IT?
Install it a day before you fly, when you have good wifi connection and toggle it OFF
Mostly the Mobimatter eSIMs start when you first use the data, but its best to have the eSIM “OFF” anyways (check your activation policy when you are buying the eSIM)
IN MY EXPERIENCE:
I have activated my eSIMs both as soon as I land at the airport and connect to wifi and also a day before I leave for my trip and the problem depends on if the airport wifi is good enough to connect to, once i had to wait to get to my accommodation before I could connect to a reliable wifi and install the eSIM
😳 HELP! I’VE LANDED AND IT DOESN’T WORK!
Don’t panic! Try these in order:
TROUBLESHOOTING
- Turn Wi-Fi OFF.
- Make sure your MobiMatter eSIM is ON.
- Make sure Mobile Data is using the MobiMatter eSIM.
- Make sure Data Roaming is ON for the MobiMatter eSIM.
- Turn Airplane Mode ON → wait 10 seconds → OFF.
- Still nothing? Restart your phone.
- Check the APN information supplied with your eSIM.
AND THAT’S IT… YOU’RE CONNECTED!
Hopefully this has helped to connect you to the world of easy access travel eSIM’s
Mobimatter really is a simple and cheaper way to travel and have data, and when you do it for the first time, it just becomes easier and easier, there really isnt much more to it, purchase it, connect to wifi, download it to the phone and activate it with a few toggles on and off and thats it
Happy travels and stay connected!
OCT26

